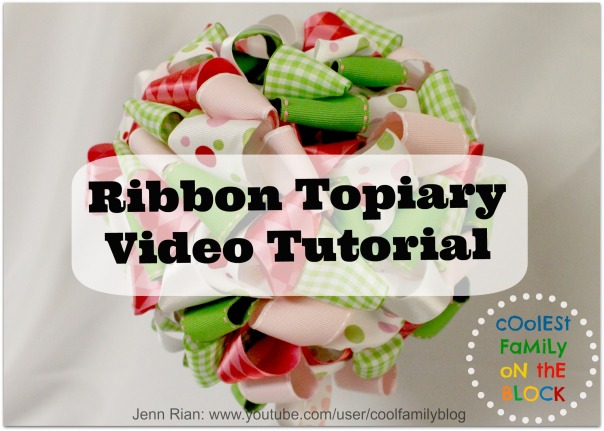
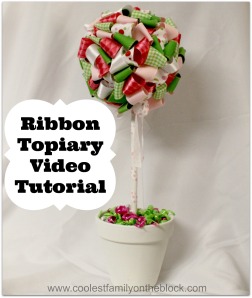
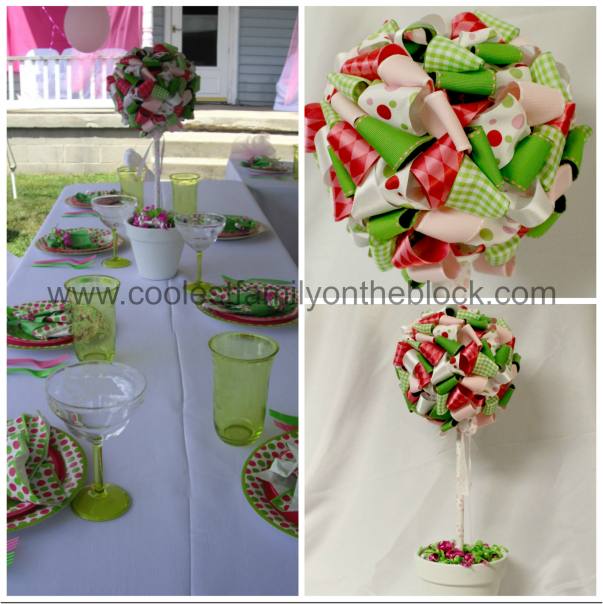
Ribbon Topiary Video Tutorial (Centerpiece)


)
For Adaline’s 1st Birthday Party in 2010 I made ribbon topiaries as the centerpieces. I originally saw the idea and tutorial on the Polka Dot Birthday blog. I bought all of the supplies for the topiaries at The Hobby Lobby and got the ribbon at 50% off.
While making the ribbon balls for the topiaries last year I made a video “tutorial” (if you can call it that) of how to put the ribbon ball together. The video is really unprofessional since I did it by myself on a whim while Adaline was napping. I didn’t even have any free hands to make the ribbon ball while holding the camera!

Supplies to make a ribbon ball:
-Styrofoam ball
-Ribbon
-Straight pins
Supplies to make a topiary:
-Completed ribbon ball or floral ball
-Wooden dowel rod
-Flower pot, bucket, basket, box, etc.
-Floral foam (to hold the dowel in place)
-Curling ribbon, Easter grass, moss, shredded paper, etc. (to cover the floral foam)
Video Tutorial for Ribbon Ball:
(Click to view on YouTube)
(Note: I edited the video on 10/31/13. To watch the excruciatingly long unedited version Click to view on YouTube.)
Instructions:
1. Cut the ribbon into 4.5″ strips

2. Loop the ribbons


Secure with two straight pins. I angled the pins.


3. Cover the entire ball with strips of ribbon. Fill in as necessary.
4. Put the floral foam into your pot or topiary base of your choice
(If the pot needs painted…paint it first!)
5. Paint or cover your dowel rod
6. Poke the dowel rod into the floral foam and also into the completed ribbon ball
7. Cover the floral foam with curling ribbon, etc.
)
Below are the details for what I used to make the 3 ribbon balls.

Details:
-I used 6 inch foam balls
-I used 16 yards ribbon per ball cut into 4.5” strips (48 yards total for 3)
-I used 20-22 strips per color and used 6 different colors,
120-132 strips per ball (360-396 total for 3)
-I used 2 straight pins per ribbon, a total of 250 pins
-The topiaries cost me $20 a piece to make
-The ribbon balls took about 2 hours each to complete
)
This post is linked to:
Tip Junkie /Design Dazzle / Patches of Pink / The Frugal Girls: Chic and Crafty
DIY No Sew Party Hat Tutorial / Tissue Number Birthday Sign (Mini-Tutorial)


Ladybug Picnic: 2nd Birthday / Pink and Green Polka Dots and Cupcakes Party: 1st Birthday / Ham and Man Party: 30th Birthday / Celebrating 30 years in 30 days! All of my birthdays from 1980-2009 / Birthday Girl…2 years old


Birthday Traditions: Personalized Birthday CD / Birthday Traditions: Knife and Cake Server / Birthday Traditions: Professional Photos / Birthday Traditions: Photo Puzzle / Happy 2nd Birthday, Adaline!
Posted on August 1, 2011, in Birthdays, Parties, Tutorials and tagged Birthday Traditions, centerpiece, diy, how to, ribbon topiary, tutorial, vlog. Bookmark the permalink. 37 Comments.


%20%23birthday%20%23traditions%20)


So pretty! 🙂
LikeLike
Thanks, Rachael 🙂
LikeLike
This is so beautiful! I can’t wait to make one!
I just found your blog from Patches of Pink, and I can’t wait to read more.
Thanks so much for sharing!!
LikeLike
Thanks for commenting, Jacki! Have you made one yet?
LikeLike
I love the centerpiece! The ribbons you chose are so cute! I don’t do very many crafts, but I may need to try this one. My daughter’s birthday is next month. 🙂
LikeLike
Thanks 🙂 I hate crafts, but this one was pretty easy to do (although a little time consuming). Did you end up making one for her birthday?
LikeLike
Can you share the dimensions of the dowel rod you used? Thanks!
LikeLike
I’m sorry but I have no idea what size rods they were 😦
I cut them to be the correct height (which I couldn’t tell you off-hand), but I have no idea what thickness they were.
LikeLike
Thank you for taking the time to do this.. you did a Great job! Very fun idea 🙂 .. going to be great for my daughters baby shower..
LikeLike
So glad this was helpful, Nikki. I’m sure they looked adorable at the shower 🙂
LikeLike
I LOVE your creative work!!! I would like to know where you purchased this beautiful ribbon?? It’s been really hard to find any pretty colors/ designs …. Thanks in advance 🙂
LikeLike
I got all supplies, including the ribbon, at Hobby Lobby. Their ribbon is often 50% off 🙂
You can order the ribbon online: http://shop.hobbylobby.com/search/default.aspx?searchTerm=Grosgrain+Ribbon&pg=7 but I’m not sure if they go on sale online.
LikeLike
I love these they are very beautiful, So you used 16 yards of ribbon for three of them or was it 16 yards per centerpiece. Thanks in advance
LikeLike
Yes, 16 yards total for 3 6″ foam balls…so about 5ish+ yards a ball. 🙂This is wrong see new comment below.
LikeLike
It is 16 yards per ball
Leesa, I know that this reply is now nearly a year old and is probably not any help anymore, but I wanted to correct myself for any new readers that are checking the comments for more details. If you see this comment I want to apologize for giving you the incorrect info and hope that you were still able to make your ribbon balls without any complications. I feel so bad 😦 I couldn’t really remember (since it had been two years since I had made the balls) and I gave you the wrong information. After a commenter recently asked me about my math I re-watched the video in which I said it was 16 yards per ball…and then I did some more calculations, and gosh-darn-it, it was 16y per ball and not for 3. Again, so sorry!
LikeLike
Hi Jenn,
Thanks so much for the tutorial on the ribbon topiary. I printed the instructions from another site previously but they were not very clear. Your little tips made it much easier.
I’m going to sign up right now for the e-mail subscription so I don’t miss anything!
LikeLike
Thanks for commenting, Charlene (and subscribing too ;))! I’m so glad this was helpful. I like detailed instructions myself. I’ll be posting a lot of party stuff from my daughter’s 3rd birthday once I get the chance.
LikeLike
What is the width of the ribbon you used? 1 1/2 inches?
LikeLike
Yes, I believe all of the ribbon was 1.5″ wide.
LikeLike
Thank you for creating this! I too saw this project on the same site but I LOVE that you included details(ribbon amount!!!) Can’t wait to make these for my daughter’s 1st birthday!
LikeLike
I like a lot of details myself, so I thought I’d share and hopefully help someone out. I’m so glad this was helpful to you. Thanks so much for commenting 🙂
LikeLike
Hello! Hello!
Thanks so much for the information on yardage used. I had a question… did the three balls take up the full 16 yards? Was there any left over? I am doing these for a baby boy baby shower and need to make 12 Topiary centerpieces. So I’m trying to figure out how much ribbon I’d need.
Thanks.
LikeLike
Thanks for commenting, Raylene!
When I was prepping to make the balls I pre-cut all of my ribbon. Since it was already cut I used all of it, you can always find somewhere to stick another piece. So yes, I used all of the ribbon with none left over.
That being said, I don’t think that you need exactly 16 yards. If the ribbon you buy comes in a yardage that leaves you with a little less or a little more you’ll probably be fine.
LikeLike
Thanks so much. 🙂
LikeLike
Raylene and new readers,
I wanted to make a correction that I actually used 16 yards per ball and not for all 3 balls as I have previously stated (I’ve since corrected the text in the post above). If you see this comment I want to apologize for giving you the incorrect info and hope that you were still able to make your ribbon balls without any complications. I feel so bad 😦
After a commenter recently asked me about my math I re-watched the video in which I said it was 16 yards per ball…and then I did some more calculations, and gosh-darn-it, it was 16y per ball and not for 3. The rest of my comment about not having any ribbon left over was correct 🙂 Again, so sorry!
LikeLike
i love home made stuff. you are talented.
LikeLike
Thank you so much, Elaine 🙂
I can’t really take too much credit, I saw the idea online and copied it. It was fairly easy as far as crafts go. I’m not a really crafty person and don’t really enjoy crafts that much. I do like making things for my kids birthdays, though, so I continue to craft anyway 😉
LikeLike
Hi.
First of all, I would like to say that this is so pretty and thank you for the detailed information.
I will try to make 20pcs for my daughter’s 7th birthday. what I would like to know is, do I need to buy a wired ribbon or just a regular ribbon would work?
Thank you
Bhel
LikeLike
Hi, Bhel!
Thanks for your comment. All of the ribbon that I used was regular ribbon with no wire. I suppose wired would work too, but it’s not necessary. Hope that helps! 🙂
LikeLike
Hi Jenn,
I got all the ribbons on 50% off with Michales because they had a sale., I got all the materials that I need based on you details above but when I go back and read yur blog something seems not right or maybe its just me.
It say above that you used 16 yards for 3pcs 6in balls, abt 120-132 cut ribbons per ball or 360-390pcs based on 4.5 inches.
I did some computation because I wanna know if I have enough ribbons for all 17pcs and how many ribbons i need per ball.
16yards (36inches per yard) x 36 = 576 inches divided by 4.5 inches = 128 cut ribbons (16yards) which means I need abt 15-18yards per ball?
sorry, I need ot know if I got it wrong or right so I can run back to Michaels coz tomorrow is their last day on sale.
Thanks
Bhel
LikeLike
Hi, Bhel
It’s not letting me reply directly to your 2nd comment, so I’m replying on the first comment you made.
It’s been 3 years since I’ve made the ribbon ball, so I can’t really remember what I did. I re-watched the video tutorial that I made and in there I said 16 yards per ball. Then I looked at the photo above that shows a shot of all of the supplies that I used. Out of all of the rolls of ribbon that are shown in the photo I used 14 rolls of ribbon for all 3 balls. The rolls were all about 3-4 yards each, so 3.5 yards x 14 rolls = 49 yards divided by 16 yards = 3.065…so 14 rolls / 49 yards would make 3 balls at 16 yards a piece. So you are correct that it is 16 yards per ball.
When I originally wrote out the tutorial I didn’t specify if the 16 yards were per ball or for 3. Then Leesa asked the question above in the comments and I couldn’t remember and incorrectly told her that it was for all three balls…then I went in and edited my post to (incorrectly) say 16 yards for 3. Oops! I’m so bad with math and combined with my poor memory, well 😦 After I publish this comment, I’ll be editing my post with the correction. Thanks so much for bringing this to my attention. I hope that you’re able to get the rest of the ribbon on sale 🙂
LikeLike
Such fantastic ideas! I am collecting all the materials for the ribbon topiary so l can create one for my twins first birthda. I will let you know how that goes! Please keep sharing your ideas for the ‘non-crafty’ people out there to copy! Thanks, Alecia 🙂
LikeLike
G’day! Great tutorial! Viewed as part of #SITS
Cheers! Joanne
LikeLike
Beautiful colors. I will make them with my senior group with scrapbook paper strips and smaller balls to save money.
LikeLike
You got all the ribbon from Hobby Lobby, didn’t you? I know because I work at Hobby Lobby, in the fabric department. That’s a really cute idea! I’ll be sure to pass it along.
LikeLike
Pingback: Happy Birthday Lainey! -Pink and Green Dot Party | Blessed to Be Large
Pingback: Oh, the places you’ll go! « bellsandthistle