Category Archives: Guest Posts
")
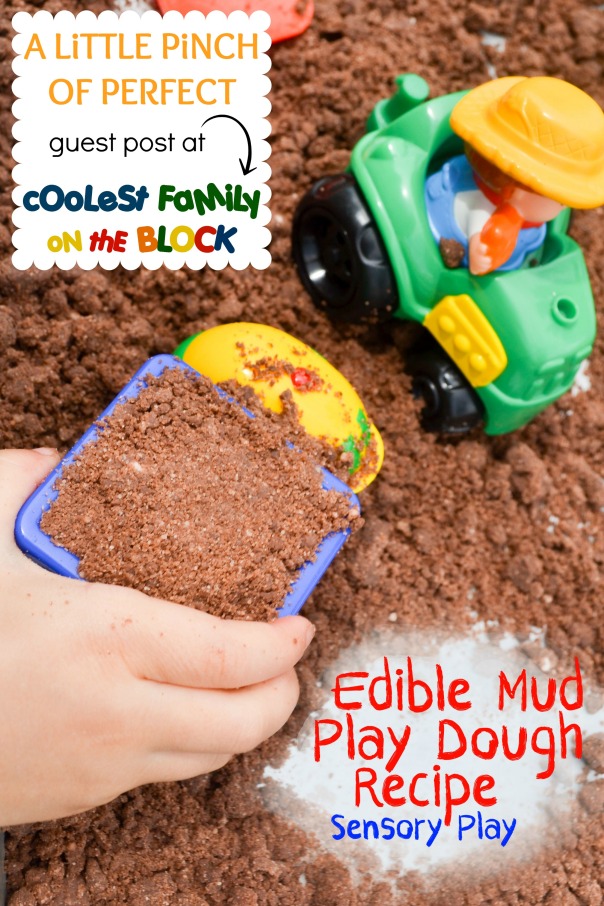
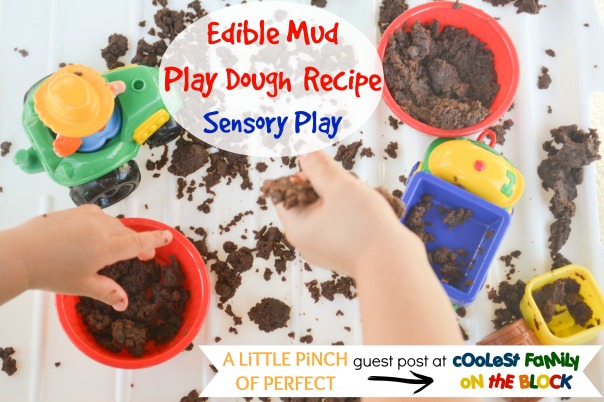
Edible Mud Play Dough (Guest Post: A Pinch of Perfect)
I’m excited to share this guest post with you by Katie from A Pinch of Perfect. Katie posted on my Facebook wall that she found me through the SITS Girls and as soon as I saw her blog I knew I had to ask her to guest post right away. Katie’s blog is packed full of great activities and fun ideas for your little ones, so be sure to visit her blog after reading and commenting on this post! Now here’s Katie…
I have noticed that mud must have some sort of magnetic properties because my son can’t seem to stay away from it. My poor garden has suffered multiple assaults from my son and his shovel. To try and deter him from the garden I wanted to make him some mud that he could play with indoors or outdoors and as often as he would like. This is how Edible Mud Play Dough came to be. It had to be edible because I think you never can be too safe when toddlers are around (my son just turned 1.5) so I work really hard at coming up with safe activities for him.
(See more Toddler Friendly Activities Here)
Our homemade mud can be made with things found in your pantry. It’s fast and simple to make and looks exactly like mud. After coming up with this awesome recipe, when my husband came home from work and took a look at the “muddy” tray on the table he wondered why I had brought mud into the house. Oh the look he gave me when I took a bite was priceless, lol! By now he should know we are always up to something fun and interesting.
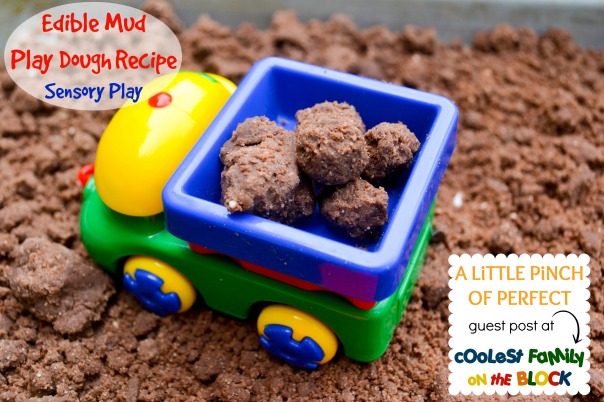
The awesome part about Edible Mud Play Dough is it is dry and crumbly and at the same time doughy and shapeable. Although it is edible, it doesn’t taste good at all so this activity shouldn’t turn into snack time. Get those trucks, shovels, and mud pie pans out because your kiddo is going to love playing with it. What a fun new Sensory Play experience!
(see more Sensory Play Activities Here)
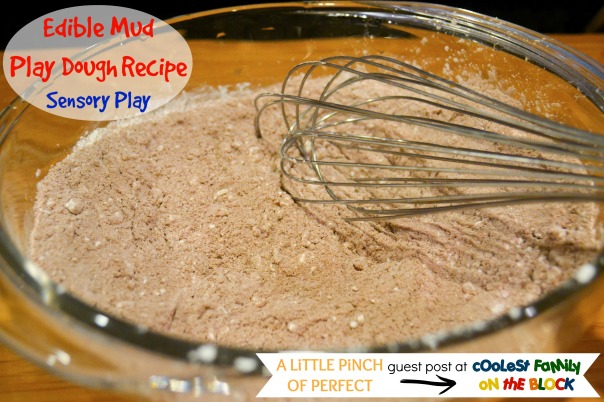
Supplies:
1 Large box of chocolate pudding mix (we used the instant kind)
1 C. baking soda
1/4 C water
3 Tbs. oil
I suggest making one batch per kid.
Directions:
Mix dry ingredients together.
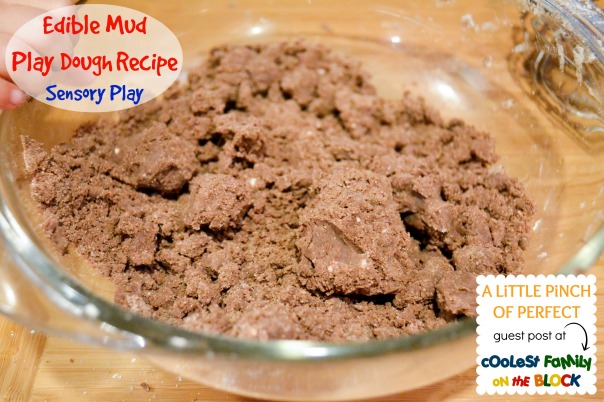
Add wet ingredients and mix evenly and it’s ready to be played with.
Makes a perfect mud ball because it can hold its shape, but will still crumble apart.
Here are my busy little kiddos smashing, filling, and building away.
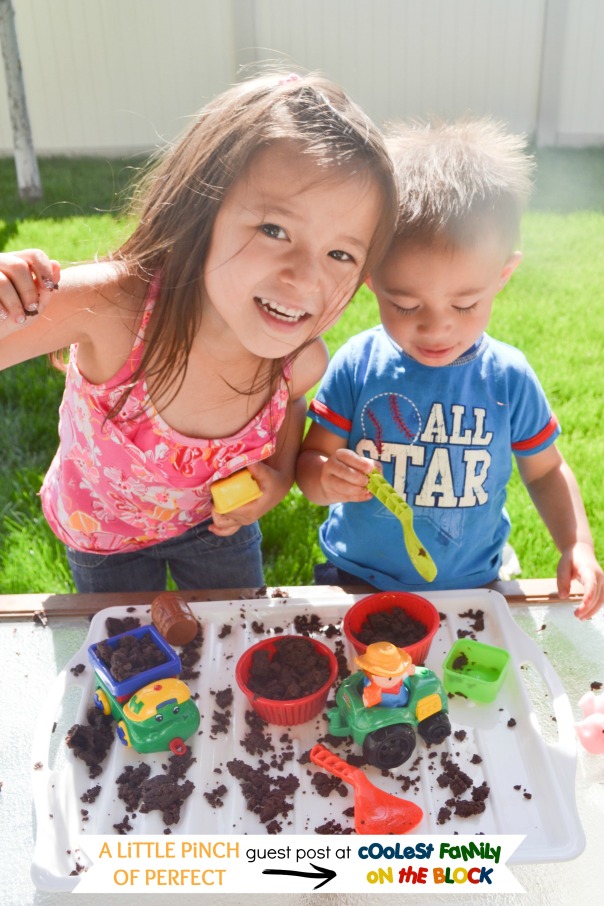
My daughter used the words, “crumbly, brown, and soft.” What sensory words will your kiddo use to describe it?
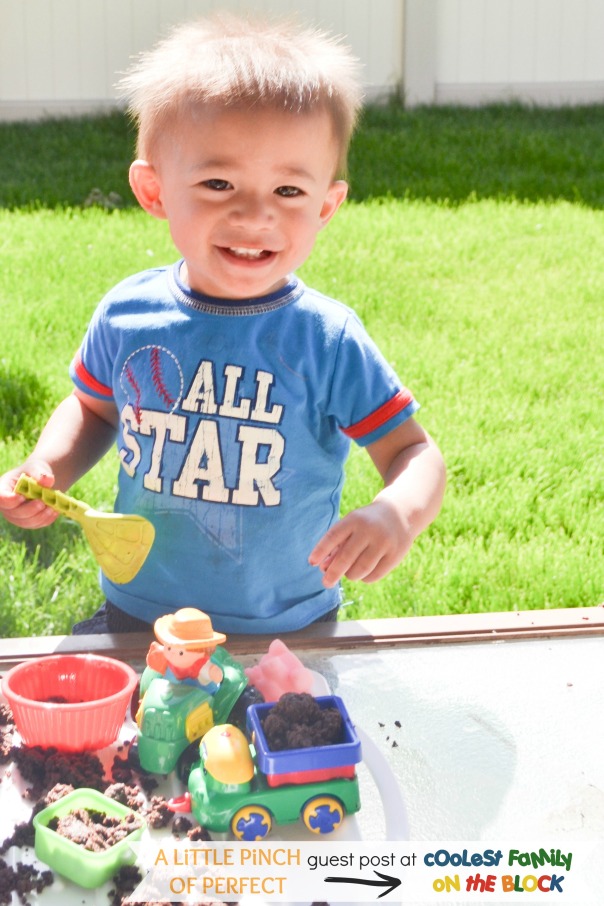
Sometimes toddlers are hard to keep entertained…well my little man played with his dough for an impressively long time and even outlasted my daughter. He must love his new mud!
We hope you enjoy our Edible Mud Play Dough Recipe. Thanks for playing with us. Drop by A Little Pinch of Perfect to say hi and make sure you catch our next fun idea!
Love-Katie and the Kiddos
![]() Katie is a Stay-At-Home-Mom who is kept busy by her spunky 3 year old daughter and curious 1 year old son. She is always coming up with new, fun, and creative ideas to keep her kiddos excited throughout the day. She believes that creativity helps little minds learn & grow in amazing ways that conventional methods only dream about. Visit A Little Pinch of Perfect to discover more or follow her on social media on Facebook, Pinterest, Twitter, Instagram, Google+, and Bloglovin’
Katie is a Stay-At-Home-Mom who is kept busy by her spunky 3 year old daughter and curious 1 year old son. She is always coming up with new, fun, and creative ideas to keep her kiddos excited throughout the day. She believes that creativity helps little minds learn & grow in amazing ways that conventional methods only dream about. Visit A Little Pinch of Perfect to discover more or follow her on social media on Facebook, Pinterest, Twitter, Instagram, Google+, and Bloglovin’
Thank you, Katie! 🙂
Do your kids love playing in the mud?
Have you ever made mud play dough?
Please leave a comment for Katie below!


This post is linked to: SITS Sharefest (July 12, 2014)
Guest Post: Making the Most Out of Every Day This Summer
This is a guest post by Theresa from Our Life in Words. Please stop by and visit her great blog!

My girls (ages 9 & 11) were only out of school for a few days when I heard, “Mom, I’m bored!”
My first reaction was what my mom used to say to me, “Is your closet clean and tidy? All your clothes hung up? Are your dresser drawers organized? Are all of your socks in the same drawer?”
As much as I never wanted to turn into my mom, summer is a great time to teach kids organization and how to clean up after themselves.
Summer is also an opportunity for parents to spend quality time with their kids doing all of those things they wish they had time to do during the year. It doesn’t have to take a lot of money.
Here are some fun *free* things you can do with your kids:
*Have a water fight; use the hose, water balloons, Super Soakers, rags & buckets
*Wash the car together – kids LOVE this!
*Make homemade play-doh together and play with it
*Go for a bike ride
*Go for a walk
*Play frisbee or catch
*Make a tea party for your little girl and use your real china & dress up
*Find a patch of lawn that doesn’t have any grass, turn the hose on and make mud pies with your son
*Make roads in the dirt with your boy, play with matchbox cars
*Check out what free summer programs your library is offering
*For more ideas on fun things to do with your kids for free over the summer, check out books or parenting magazines in your local library!
Work on school skills:
*Play Mad Libs – Kids LOVE Mad Libs and they are a great, fun way to teach parts of speech.
Google Free Mad Libs or check out Education Place.
*Play Math Bingo – I bought this game in the Dollar Store and my kids LOVE it!
*Sign up for summer reading programs at your local library
*Write a story with your kids. Start with a sentence and ask your children to each add a sentence. If they are too young to write, write it down for them. Have them illustrate it.
*Keep a journal with your kids of all of summer fun you have. Press flowers from your walks and glue them in. Or take photos of your fun and glue them in.
“The days are long, the years are short.” ~ Gretchen Rubin
Make the most of every moment with your child because childhood doesn’t last forever!
Do you have any suggestions for frugal fun this summer?
Theresa is a former teacher who spent nine years as a stay at home mom. She now works part-time as the Assistant Children’s Librarian at her local library. She blogs regularly at Our Life in Words and weekly at Three Thinking Mothers.
Guest Post: Coolest Mud Pie Cake Ever! (Recipe)
This is a guest post by Retha from Mommy Bee Wisdom. Be sure to stop by and visit her blog 🙂
Fitting name right? I have tried for 5 years now to out-do the coolness of this cake and have failed. It was so cool, I have had sisters since copy me, so now I figured is the right time to share it.
Supplies you will need:
2 Boxes of Chocolate Cake mix (I always use 2 to 4 depending on the guests).
2 tubs of Chocolate Frosting (keep this number equal to the amount of cake mixes).
2 bags of gummy worms
A wheel barrel (toy plastic and washed with dish soap)
A shovel (toy plastic and washed with dish soap)
If you want this a bit more girly, add one small terracotta pot and a fake flower and some pink gloves.
Instructions:
1. Follow the instructions on the cake mix box. Bake each box separately, trust me on this one.
2. Allow the cakes to cool completely, then frost as you normally would.
3. Spread the gummy worms over the cakes.
4. Now very carefully pick up each cake and dump it into the clean toy wheel barrel.
5. With a spatula run it through the cakes to make them look nice and chunky.
6. Sprinkle a few gummy worms over the top of the cake.
for the girl cake put a shovel full of cake in the pot and insert the flower, stick it on top of the cake and lay the gardening gloves over the edge.
7. Insert the shovel into the cake.
TA-DA!
")
Now you have the coolest ever mud pie/gardening cake!
Retha Barton blogs at Mommy Bee Wisdom where she teaches other moms that living life from scratch isn’t as hard as it sounds. Retha shows you that you can make it without a lot of money and that sometimes doing things the old way can be more rewarding.
Related Posts:
*Guest Post: Food as Tradition – Norwegian Butter Cookies: Another recipe guest post by Retha!


Guest Post: Planting Flowers and Practicing Skills
This is a post from Amanda at Gratefully Growing in Grace who also brought us the Breakfast Basket guest post on June 7. Amanda has a great blog, so be sure to stop by for a visit!
Planting Flowers and Practicing Skills
My name is Amanda and I’m visiting again from Gratefully Growing in Grace where I write about baby, toddler, and preschool activities, crafts I attempt, recipes I manage to cook successfully, and as any good mommy blog includes, cute stories, photos, and videos of my children.
I’ve been blessed to celebrate three Mother’s Days and each year I have asked for the same thing: a mushy card, a photo of me with my children (I have a special frame for the photos), and flowers to plant. My only stipulation is that we all plant the flowers as a family. Doesn’t my husband have an easy job of thinking of Mother’s Day gifts and activities? This year was the first time my son could really help plant the flowers. He could dig the holes with me, choose which flower to put in the hole, place it there, pack the dirt around it, and water it. We had a blast and I can’t wait to have a home where we can plant more flowers and for my daughter to be able to help us – maybe next year!
")
We had so much fun planting flowers that I wanted to find a way for us to do it again and again. After reading an article (sorry, I can’t remember details because I usually read when my brain is tired to begin with) about preschoolers practicing hand-eye coordination and fine motor skills, I came up with an idea. I’m sure it isn’t original, but my tired brain thought it was brilliant at the moment.
I bought a small storage basket with holes and a few artificial flowers at the Dollar Tree. I rounded out my artificial flower pile by having my mom donate some of her extras. I used a wire cutter to trim the flowers up to be single stems without a lot of extra leaves and stuff on them.
I washed all the flowers in soapy water and let them dry because I’m a germophobe like that. Next, I gave the pile of flowers and the basket to Mini Me and said, “Let’s make a garden!” Simple as that, we turned the basket on its side and began using steady hands to poke the flower stems into the nifty holes. Tada!


The first time Mini Me did this is took approximately 2.5 minutes and he was off and running. I was crushed that my brilliant-but-not-so-original idea was such a dud. But… he came running back to it later after I’d taken the flowers out and wanted to do it again. Then the next day, he wanted to plant his garden again. I started making him put the stems in the smallest holes for more practice. One day he lovingly made a garden and presented it to me, asking if I could keep it on the table for decoration all day. Awwww… Mother’s Day lives on and my preschooler’s fine motor skills are being fine tuned!
Amanda is the author of Gratefully Growing in Grace where she blogs about baby, toddler, and preschool activities, crafts she attempts, and recipes she manages to cook successfully.
Guest Post: Sustainable Living – It’s Not Just for Hippies Anymore
This is a guest post by Sarah from Professional Intern. Please stop by her blog today!
Beginning with Henry David Thoreau and the philosophy of the Transcendentalists, the Green Movement has slowly edged its way into the human psyche. While this way of living was originally believed to only appeal to hippies and other activists, it has now become commonplace. It is not unusual to see people drinking from reusable containers, carrying their groceries and lunches in reusable bags, and wearing clothing that advertises for this movement.
My mother was the person who started me off with this, when she taught me to recycle. She did this mostly because we lived out in the country and did not have a garbage service. We recycled cans, bottles and newspapers, burned what we could, and were left with one small trash bag every week (for a family of eight), which we would usually dispose of in the dumpster behind the local high school.
Upon graduation, I moved to the nearest city and took the available trash service for granted for several years. I threw out anything and everything, never giving much thought to recycling or reusing. I wish I could say that this was due to an inability to do so, but the truth is that I was lazy and unaware of the impact that my actions had on the environment.
All of this changed after I took a fascinating social philosophy class. There, we discussed at length the green movement, sustainable living, and the past, present and future impact that living wastefully and thoughtlessly has on the Earth. This class reminded me of the importance of making responsible choices throughout my day, and I made a commitment to start making changes immediately.
Some of these changes were easy to implement: I had some broken laundry baskets that I was about to get rid of; instead, I labeled them “plastic,” “glass,” “metal,” and “paper” and was able to reuse them. I bought recycled goods whenever possible (there are trash bags, paper towels, toilet paper, etc., that fall under this category). I made my own cleaning goods whenever possible, and bought environmentally-friendly products when I could. I shopped at a local grocery store that allowed and encouraged its customers to take their groceries home in the boxes that the store would otherwise throw away, and I then reused the boxes for storage, crafts, and to start fires.
After all of the obvious bases were covered, I brainstormed for other ways that I could be more environmentally conscious. I started using cloth diapers for my daughter. This may not seem like a big deal to all of you non-parents out there, but I was throwing away between four and six diapers a day, which equated to an average of 150 diapers a month. This not only helped my local landfill, but my pocketbook as well. I paid nearly $100 for twelve cloth diapers and additional inserts, and never had to buy another disposable diaper again. In fact, they were so durable that I passed them on to my sister-in-law, who made good use of them before passing them on to her sister-in-law.
I’m a homeschooler, and I discovered that many of the things I was throwing away could easily be reused for a craft project of some sort. Milk jugs can be made into bird feeders, as can empty paper towel and toilet paper rolls; paper with printing on just one side can be used for its other side; paper that has been thoroughly used can still be used in collages and the like (along with used magazines).
Perhaps one of the biggest surprises I had was when it came time to buy some patio furniture. We had a plastic set that was slowly falling to pieces, and when I looked into recycling it, I was dismayed to discover that there were no local places that would accept it for recycling. After so many months of scrupulous green living, I felt defeated when I ended up throwing our old furniture away. When I shopped for new furniture, I eventually settled on cast aluminum patio furniture, partly because of its attractiveness, but also largely because aluminum is 100% recyclable, unlike plastic.
My husband started off as a large impediment to the changes I was trying to implement. He had grown up in the city and had a “sustainable living is for hippies” mentality. I frequently had to dig his soda cans and glass bottles out of the garbage can. However, when he no longer had to pay for diapers and saw that I was making money from the aluminum cans I was recycling, he changed his mind and started helping out a little more.
Now, it is commonplace for my family to recycle and reuse whenever possible. My son has actually caught me mistakenly throwing away something that I could have recycled, and he gleefully reprimanded me for it. My daughter is still a little too young to understand about living green, but we have moved back out to the country, and it is my hope that she will grow up thinking it is normal, and that “wasteful living is for losers,” whereas sustainable living is for everyone.
Guest Post: ABC Photo Essay
This is a guest post from Pamela at Reviews She ROTE.
Stop by her blog today!
Having an ABC day is a fun way to keep your kids busy all day or, as I did this time, all week. Last year at the end of school I was looking for ways my kids could stay active all day so I didn’t have to hear “MOMMY I’M BORED” I did a day last year, but this year I stretched it out for a whole week!!! We didn’t do it alphabetically but every letter was used, to keep track I had a list and when we did the activity I filled in that letter, some were planned others just happened and the kids found it fun to find ways to fill in the last few letters.
Here’s a photo essay to show you all the fun things we did. Don’t worry there are NOT 26 photos (sigh of relief from all LOL).
Doing a little Artwork

Blowing Bubbles

Cuddles with Cat

Making up some Dumplings for Dinner

Hayden on the High slide and enjoying some Ice-cream


Climbing on the Junglegym, Kisses for Dad…Kayleigh having Lemon aide from McDonalds and Nuggets


Outside fun

Ravishing Pancake Smile what a Qt!!!

Talking to Uncle then enjoying Veggie chips.


Washing the car

a little X-box when the rain came

…and making Y‘s on the lawn.

At the end of the day TIME for BED and catching some Zzzzzzzzzzzzzz‘s
Pamela is the author of Reviews She ROTE. Pamela is a SAHM of two children. She enjoys scrapbooking, taking photos, and a little reality TV. Pamela says, “I’ve had a blog for a while but just in the past few months really taking it more serious. I blog about “life” and I also do product reviews and a few giveaways feel free to check me out.” 🙂


%20%23birthday%20%23traditions%20)

)