Blog Archives
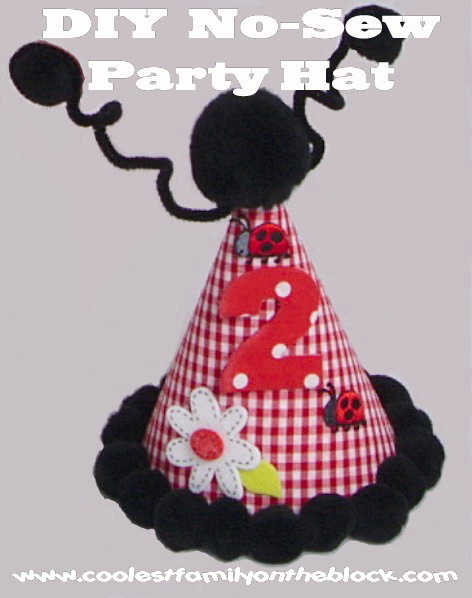
DIY No Sew Party Hat Tutorial
For Adaline’s 2nd Birthday Party I decided to try to make her party hat myself. Even though I knew she wouldn’t keep it on her head and I probably wouldn’t even get any decent pictures of it…every little kid should have a party hat for their birthday!
I do not sew and I’m not really crafty, so I came up with a fairly easy no sew party hat. The whole idea is to get any cardboard party hat and cover it with either scrapbook paper or fabric to match your party theme and then add embellishments.

Supplies you will need:
(2) Cardboard party hats
Fabric or Scrapbook Paper
Hot Glue Gun (and Glue Stick if you’re using paper)
Scissors
Chalk
Ribbon
Embellishments (Pom Poms, feathers, etc.)
Step 1: Trace and Cut
-Carefully unravel one of the cardboard party hats to use as a template
-Set it on the fabric/paper and trace around it. Be sure to trace a little wider to give you extra room for mistakes. Use chalk for tracing on fabric and pencil for paper…something that can be easily wiped off or erased.
-Cut it out


Step 2: Glue Fabric to Hat
-Adhere the fabric/paper to the party hat that’s still put together.
I used a glue stick for paper and a hot glue gun for fabric.
When using the hot glue gun I pressed things down using a spoon so that I didn’t burn my fingers.
Note: Because I used a designed party hat you could actually see the design through the fabric :(, so I covered the hat with scrapbook paper first and then with fabric.


-Because my “seam” was crooked and I was messy with the hot glue I decided to cover the seam with a ribbon to hide my mess 🙂

Step 3: Glue Trim to Hat
-Using a hot glue gun add your embellishments to the top and rim of the hat. I used pom poms.

Although I don’t show it in the photos, I also hot glued two ribbons to the inside of the hat to tie the hat on in place of a chin strap.

You can stop here or add more personalization to your hat. If you are making hats for all of your guests I would probably just add the chin strap and leave the guests’ hats like this but further personalize the birthday kid’s hat.
Adding a number to your hat (Optional)
Supplies you will need:
-Number template or stencil
-Felt and fabric
-Marker
-Scissors
-Hot Glue Gun

Step 1:
-Trace and cut your felt number.
I didn’t have a stencil, so rather than drawing freehand I chose a size and font and printed out a #2. I then cut out the #2 and placed it on top of the felt. I traced the number with a Sharpie marker because I intended to cover it with fabric. If you’re just going to use the felt be sure to trace out a little further so that you can cut off the marker lines so they aren’t visible.

-Trace and cut your fabric number.
I wanted to add the polka dot fabric to my hat so I chose to cover the felt number in fabric. To do this I traced the cut out felt #2 onto the fabric using chalk and then cut out the fabric.

Next I taped one end of the fabric to the felt (I used sticky back felt so the back was covered with paper. I then hot glued the fabric around the edges of felt trimming away any excess fabric that I didn’t need.

Step 2:
-Hot glue the number to the hat.
To make sure that I put the number right where I wanted it I first used scotch tape to tape it to the hat and then I used chalk to make a few guide marks. Then I hot glued the number onto the hat.


Making a Ladybug Party Hat (Optional)
Supplies you will need:
-(2) Fuzzy sticks (pipe cleaners)
-(2) Pom Poms
-Hot Glue Gun
-Additional ladybug embellishments.
For Antennae I hot glued tiny pom poms to the end of fuzzy sticks. I then twisted the pipe cleaners around the top of the hat under the large pom pon.

I found iron-on ladybugs that had sticky backs at Hobby Lobby. I just used the sticky backs and added them to the hat (you can hot glue to be sure they stick).

I wanted to add a white daisy with red center to match the flowers on Adaline’s dress.

I found these Felties at a craft store (Pat Catan’s).

They had white daisies with yellow centers and yellow daisies with white centers. They had sticky backs and the centers were just stuck to the flowers so I pulled the white center off and colored it red with a Sharpie marker and then put in on the white flower instead of the yellow center. I peeled off the back and stuck it to the hat (you can hot glue to be sure they stick).
The finished product…


Related Posts
BIRTHDAY TUTORIALS
*Ribbon Topiary Video Tutorial (Centerpiece)

*Tissue Number Birthday Sign (Mini-Tutorial)

BIRTHDAY PARTIES
*Ladybug Picnic: 2nd Birthday

*Pink and Green Polka Dots and Cupcakes Party: 1st Birthday

*Ham and Man Party: 30th Birthday

*Celebrating 30 years in 30 days! All of my birthdays from 1980-2009

BIRTHDAY TRADITIONS

*Birthday Traditions: Personalized Birthday CD
*Birthday Traditions: Knife and Cake Server
*Birthday Traditions: Professional Photos
*Birthday Girl…2 years old: Photos of Adaline at her birthday party
*Happy 2nd Birthday, Adaline!
+Birthday posts will be published all throughout September 2011 including tutorials, party decor ideas, and birthday traditions!

Coolest Family on the Block is committed to helping you find creative ways to have fun and make memories with your family all year-long. Don’t miss an idea, tip, or trick…subscribe and have updates sent directly to your email!


%20%23birthday%20%23traditions%20)

)