Category Archives: Ladybug Party

Making a Preschool Classroom Valentine

For Adaline’s Montessori Preschool class each child has to make one big Valentine to bring to school that their classmates will sign rather than bring in individual Valentine’s for each student. Honestly, I think that’s a GREAT idea and I’m so glad that she won’t be coming home with 25 different lollipops with eyes glued to them! 😉
I filmed the creative process of making “The Adaline Flower” with a 4.5 year old. Watch and be amazed!
(Video here)
(I post a lot of funny vlogs on my YouTube channel. Subscribe to follow along!)
To make the classroom Valentine for preschool we
-Cut a heart out of red poster board
-Colored craft sticks and glued them around a photo to make petals and a stem for a flower
-Made leaves out of fuzzy sticks
-Made a sun out of construction paper
-Made a pom pom lady bug
-Used glitter glue around the edges to make it shimmery
It was tough to reign in Adaline’s creativity. She LOVES art and wanted to draw all over the Valentine but she needed to keep it blank so that her classmates could sign it. I have a feeling her friends are going to end up with quite a few drawings of hers on their Valentines.

The pom pom ladybug was Adaline’s favorite part.
We used a black Sharpie marker to make dots on a pink pom pom, used a smaller black pom pom for the head, added googly eyes and adhered it all using craft glue. Adaline drew wings and legs around it onto the poster board.

Does your child’s school allow individual
Valentine’s or one classroom Valentine?
Let me know in the comments!


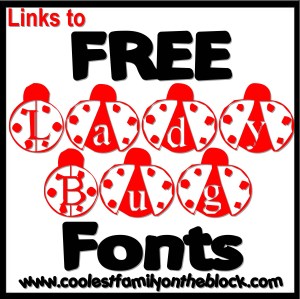
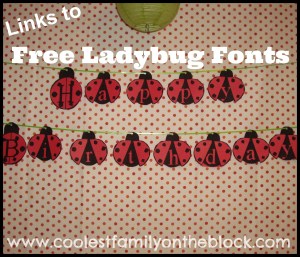
Free Ladybug Fonts (Links)
I thought I’d share with you some of the free Ladybug fonts and bug fonts that I found online while planning Adaline’s Ladybug Picnic. I did not create or design any of these fonts, this is just a list of links to the sources where I found and downloaded the fonts for free.
In addition to free ladybug fonts I’ve included free bee fonts, free butterfly fonts, and other free bug/insect fonts.
)
I found all of the Free Ladybug Fonts below at EverythingLadybug
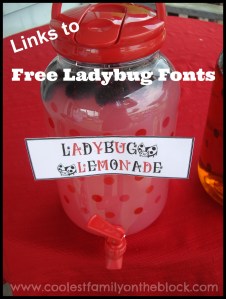
Font: KR Ladybug True Type Font

I used the above font for a Ladybug Lemonade label. The other ladybug on there are the Ladybug Dings True Type Font (Captial N).
)
Font: 101! Lady Bug Luv True Type Font

Font: Ladybird True Type Font

Font: Ladybug Dings True Type Font

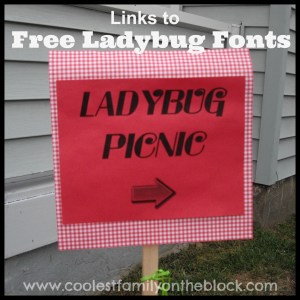
Font: Ladybug Italic True Type Font

I used the above font for my Ladybug Picnic sign
Font: LMS Ladybug True Type Font

Font: LMS London Bugs True Type Font by London’s Letters @ FontSpace.com

I used the above font to create a Happy Birthday banner.
Font: LMS Ladybird True Type Font

Font: Flag waving ladybug True Type Font

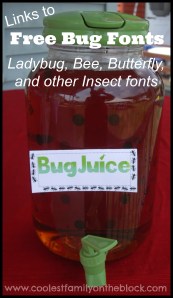
FREE BUG FONTS
In addition to the fonts below more free bug and insect fonts can be found at FontSpace.com/category/insects
Font: Picnic Parade by London’s Letters @ FontSpace.com
![]()
Font: KR Ants by Kat’s Fun Fonts @ FontSpace.com
![]()
Font: Ant Pile @ Font-Zone.com

Font: a bug’s life by Filmhimmel @ dafont.com
a bug’s life by 
I used the above font to create a Bug Juice label for the iced tea. The surrounding ants were made using the Ant Pile font (left to right: Lower case a, lower case d, upper case C).
Font: KR Cute As A Bug Font by Kat’s Fun Fonts @ 1001fonts.com
![]()
Font: LMS Yes Young Grasshopper by London’s Letters @ FontSpace.com
![]()
Font: Along Came a Spider by Kat’s Fun Fonts @ FontSpace.com
![]()
FREE BEE FONTS
In addition to the fonts below more free bee fonts can be found at FontSpace.com Search: Bees
Font: Hunny’s Bees by Barb Johnson@ FontSpace.com
![]()
Font: Bees by Lady Sara @ FontSpace.com
![]()
Font: Sssssum by Dingfontbats @ FontSpace.com
![]()
Font: JLR Bizzy Beez by GorillaBlu @ FontSpace.com
![]()
Font: KR Buzzzz by Kat’s Fun Fonts @ FontSpace.com

Font: LMS Spelling Bee by London’s Letters @ FontSpace.com

Font: D3 Honeycombism by Digitaldreamdesign @ FontSpace.com

FREE BUTTERFLY FONTS
In addition to the fonts below more free butterfly fonts can be found at FontSpace.com/category/butterflies
Font: KR Butterfly by Kat’s Fun Fonts @ FontSpace.com
![]()
Font: KR Butterfly Two by Kat’s Fun Fonts @ FontSpace.com
![]()
Font: KR Butterfly Three by Kat’s Fun Fonts @ FontSpace.com

Font: Butterfly Letters by Darrian Lynx @ FontSpace.com
![]()
Font: Butterfly Chromosome by Astigmatic One Eye Typographic Institute @ FontSpace.com
![]()
Font: LMS Beautiful Butterfly by London’s Letters @ FontSpace.com
![]()
Related Posts
Ladybug Picnic: 2nd Birthday / Free Dr. Seuss Fonts


DIY No Sew Party Hat Tutorial
For Adaline’s 2nd Birthday Party I decided to try to make her party hat myself. Even though I knew she wouldn’t keep it on her head and I probably wouldn’t even get any decent pictures of it…every little kid should have a party hat for their birthday!
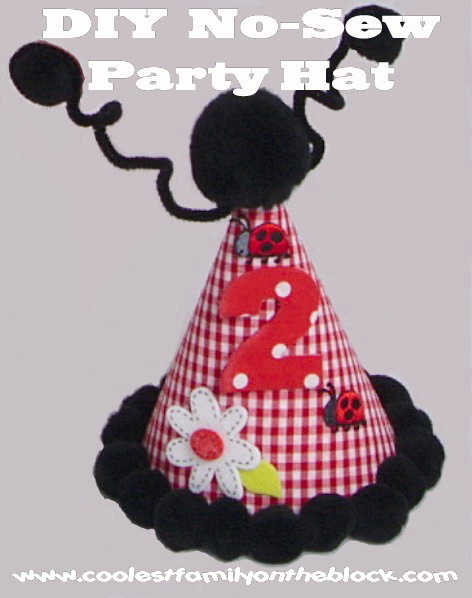
I do not sew and I’m not really crafty, so I came up with a fairly easy no sew party hat. The whole idea is to get any cardboard party hat and cover it with either scrapbook paper or fabric to match your party theme and then add embellishments.

Supplies you will need:
(2) Cardboard party hats
Fabric or Scrapbook Paper
Hot Glue Gun (and Glue Stick if you’re using paper)
Scissors
Chalk
Ribbon
Embellishments (Pom Poms, feathers, etc.)
Step 1: Trace and Cut
-Carefully unravel one of the cardboard party hats to use as a template
-Set it on the fabric/paper and trace around it. Be sure to trace a little wider to give you extra room for mistakes. Use chalk for tracing on fabric and pencil for paper…something that can be easily wiped off or erased.
-Cut it out


Step 2: Glue Fabric to Hat
-Adhere the fabric/paper to the party hat that’s still put together.
I used a glue stick for paper and a hot glue gun for fabric.
When using the hot glue gun I pressed things down using a spoon so that I didn’t burn my fingers.
Note: Because I used a designed party hat you could actually see the design through the fabric :(, so I covered the hat with scrapbook paper first and then with fabric.


-Because my “seam” was crooked and I was messy with the hot glue I decided to cover the seam with a ribbon to hide my mess 🙂

Step 3: Glue Trim to Hat
-Using a hot glue gun add your embellishments to the top and rim of the hat. I used pom poms.

Although I don’t show it in the photos, I also hot glued two ribbons to the inside of the hat to tie the hat on in place of a chin strap.

You can stop here or add more personalization to your hat. If you are making hats for all of your guests I would probably just add the chin strap and leave the guests’ hats like this but further personalize the birthday kid’s hat.
Adding a number to your hat (Optional)
Supplies you will need:
-Number template or stencil
-Felt and fabric
-Marker
-Scissors
-Hot Glue Gun

Step 1:
-Trace and cut your felt number.
I didn’t have a stencil, so rather than drawing freehand I chose a size and font and printed out a #2. I then cut out the #2 and placed it on top of the felt. I traced the number with a Sharpie marker because I intended to cover it with fabric. If you’re just going to use the felt be sure to trace out a little further so that you can cut off the marker lines so they aren’t visible.

-Trace and cut your fabric number.
I wanted to add the polka dot fabric to my hat so I chose to cover the felt number in fabric. To do this I traced the cut out felt #2 onto the fabric using chalk and then cut out the fabric.

Next I taped one end of the fabric to the felt (I used sticky back felt so the back was covered with paper. I then hot glued the fabric around the edges of felt trimming away any excess fabric that I didn’t need.

Step 2:
-Hot glue the number to the hat.
To make sure that I put the number right where I wanted it I first used scotch tape to tape it to the hat and then I used chalk to make a few guide marks. Then I hot glued the number onto the hat.


Making a Ladybug Party Hat (Optional)
Supplies you will need:
-(2) Fuzzy sticks (pipe cleaners)
-(2) Pom Poms
-Hot Glue Gun
-Additional ladybug embellishments.
For Antennae I hot glued tiny pom poms to the end of fuzzy sticks. I then twisted the pipe cleaners around the top of the hat under the large pom pon.

I found iron-on ladybugs that had sticky backs at Hobby Lobby. I just used the sticky backs and added them to the hat (you can hot glue to be sure they stick).

I wanted to add a white daisy with red center to match the flowers on Adaline’s dress.

I found these Felties at a craft store (Pat Catan’s).

They had white daisies with yellow centers and yellow daisies with white centers. They had sticky backs and the centers were just stuck to the flowers so I pulled the white center off and colored it red with a Sharpie marker and then put in on the white flower instead of the yellow center. I peeled off the back and stuck it to the hat (you can hot glue to be sure they stick).
The finished product…


Related Posts
BIRTHDAY TUTORIALS
*Ribbon Topiary Video Tutorial (Centerpiece)

*Tissue Number Birthday Sign (Mini-Tutorial)

BIRTHDAY PARTIES
*Ladybug Picnic: 2nd Birthday
*Pink and Green Polka Dots and Cupcakes Party: 1st Birthday

*Ham and Man Party: 30th Birthday

*Celebrating 30 years in 30 days! All of my birthdays from 1980-2009

BIRTHDAY TRADITIONS

*Birthday Traditions: Personalized Birthday CD
*Birthday Traditions: Knife and Cake Server
*Birthday Traditions: Professional Photos
*Birthday Girl…2 years old: Photos of Adaline at her birthday party
*Happy 2nd Birthday, Adaline!
+Birthday posts will be published all throughout September 2011 including tutorials, party decor ideas, and birthday traditions!

Coolest Family on the Block is committed to helping you find creative ways to have fun and make memories with your family all year-long. Don’t miss an idea, tip, or trick…subscribe and have updates sent directly to your email!


Adaline’s 2nd Birthday Party: Ladybug Picnic


Saturday we had Adaline’s 2nd Birthday Party. The theme was Ladybug Picnic and the colors were red, black, green, and white.

I reused Adaline’s birthday sign from last year out front again. Even though it didn’t go with this year’s theme it’s just too cute to sit in a box and not get used!

I made a balloon wreath for the front door. I decided to use multi-colors so that it can be used each year. I’m so glad that I made it…Adaline loves it!

*Coming Soon: Balloon Wreath Tutorial and Links Post
This way to the Ladybug Picnic…

Tent and Tablescape
We rented a tent for the backyard so that everyone would have a place to sit and eat. Unfortunately it was so hot that once we finished eating we all crammed inside the house for the remainder of the party. Since Adaline and her 1 year old cousin were the only kids I didn’t bother to plan any games or activities.

I thought these pinwheels and mesh butterflies really added a lot in the tent, but it’s hard to tell in the picture. It was a really windy day so Adaline had fun standing in front of the pinwheels yelling, “They’re spinning!” 🙂


I couldn’t get great pictures of the tables because it was so windy and everything kept blowing away!


Centerpieces
I put together these centerpieces of a Ladybug having a picnic 🙂
*Coming Soon: Lady Bug Picnic Centerpiece Tutorial


Place Settings

The tissue paper flowers are actually noisemakers. Adaline loved carrying them around but every time someone would blow one (which wasn’t often) she would say, “I scared of those!”.
I added adhesive wooden ladybugs to these bamboo forks that I got at a party store.


Bug Juice
The Ladybug Lemonade is raspberry lemonade with frozen blackberries in it and the Bug Juice is iced tea. I made the little signs myself. They don’t fit quite right because I was going to set them on the table rather than attach them to the dispensers but it was so windy they kept blowing away.
*FREE Ladybug Fonts Other free fonts include butterflies, bees, and other bugs/insects.

Yay, for number 2 ice cubes!
They’re actually frozen cranberry juice, but you could use food coloring, or Kool-Aid or any red beverage 🙂
(I tried adding blueberries so that the ice cubes would have ladybug spots. Unfortunately the silicone molds were too small and the cubes would break everywhere there was a blueberry :()

Food Table


I made this Happy Birthday sign last minute (literally half and hour before the party) by using a ladybug font and printing it out onto red cardstock.
*FREE Ladybug Fonts Other free fonts include butterflies, bees, and other bugs/insects.


We kept the food really simple. Sandwiches, veggies and dip, and fruit salad. The end.
To keep the picnic theme going we put all of the food inside of baskets from The Dollar Tree and lined them with a cut up plastic gingham tablecloth from a different dollar store.


I got these cute mini bug nets with lollipops in the clearance section of Wal-Mart after Easter.

Ladybug Cake
I decorated this ladybug cake, which is why it looks like such a mess. This is only the 3rd cake that I’ve ever decorated
*Related Posts: Adaline’s Giant Cupcake Smash Cake
Cool Daddy’s Ham and Man Pig cake

Singing Happy Birthday to the Birthday Girl! 🙂


Oh no, black teeth! Too bad this is the best pic I got of her all day!

*Related Posts: Birthday Girl…2 years old: Additional photos of Adaline from her birthday and party
Nice 😉

Party Hat and Dress
This is a closer look at the hat that I made for Adaline.

Sorry, she’s stuffing her face in the first picture and the antennae are crooked in the other. Oh well.

DIY No Sew Party Hat Tutorial: Step by step instructions 🙂
This is the only picture I have where you can see Adaline’s entire dress. I loved that the dress was gingham so it tied in the picnic theme with the ladybugs…which are pockets by the way ;)! The dress is by Jenny and Me and I got it at Burlington Coat Factory for $9.99!

Photo Display
I set Adaline’s photos up the same way as last year but replaced them with pics of the last 12 months. This year I added sticky felt ladybugs above each photo 🙂


Photo “Booth”
I found a polka dot shower curtain and Wal-Mart and thought it would be perfect for a photo backdrop. We just hung it on the side of the house and put covered chairs in front 🙂

By the end of the day Adaline was not interested in getting a picture with her parents 😦

To see more pictures of Adaline at her birthday party click here.

**Disclosure: Links to amazon.com contained in this post may be affiliate links in which case I might receive a very small amount of money if you make a purchase using my links**
Related Posts

BIRTHDAY TUTORIALS
*DIY No Sew Party Hat Tutorial

*Ribbon Topiary Video Tutorial (Centerpiece)
*Tissue Number Birthday Sign (Mini-Tutorial)
BIRTHDAY PARTIES
*Birthday Girl…2 years old: Photos of Adaline at her birthday party
*Ladybug Picnic: 2nd Birthday
*Pink and Green Polka Dots and Cupcakes Party: 1st Birthday
*Ham and Man Party: 30th Birthday
*Celebrating 30 years in 30 days! All of my birthdays from 1980-2009
BIRTHDAY TRADITIONS
Birthday Traditions: Personalized Birthday CD / Birthday Traditions: Knife and Cake Server / Birthday Traditions: Professional Photos / Birthday Traditions: Photo Puzzle / Happy 2nd Birthday, Adaline!


%20%23birthday%20%23traditions%20)

)