Author Archives: Jenn Rian
Tissue Number Birthday Sign (Mini-Tutorial)

I get a lot of compliments, comments, and questions about the Tissue Number Birthday Sign that I made for Adaline’s First Birthday Party. I tried to include all of the links in the original post, but I thought this deserved a post of its own. This is only going to be a “mini” tutorial, which means I’m going to tell you how I made it but you’re going to need to go to the original website for step-by-step instructions.
I found the tutorial for the tissue paper sign here: Prudent Baby
Basically what I did was:
1. I bought an artist’s canvas from The Hobby Lobby
2. I bought a pillowcase and sheet set from Target
(Obviously you can use fabric, but we don’t have a fabric store nearby so I improvised.)
3. I cut one of the pillowcases and stapled it to the canvas
4. I cut tissue paper flowers. Details found here
(Mine looked awful at first…took me awhile to get the hang of it.)
5. I used chalk to make an outline of the #1 on the pillow case
6. I twisted the bottoms of the tissue paper flowers and hot glued them to the pillow case inside the chalk outline.
7. All done!

Like I said the original tutorial that I found and used was Prudent Baby DIY Tissue Number Birthday Sign, they give details and show pictures of how to make it.
NOTE: Apparently WordPress hates me and it keeps breaking my links to the Prudent Baby website. I keep fixing them and it keeps breaking them again. Here are some ways you can hopefully fix that.
1. Click on one of the links to Prudent Baby and if it comes up saying the page doesn’t exist add .html to the end of the url in your browser. I keep doing this within this post and WordPress keeps erases the .html part 😦
OR IF THAT DOESN’T WORK
2. If the two following links don’t work when you click on them try copying and pasting them into your browser (separately of course).
http://www.prudentbaby.com/2010/06/diy-tissue-number-birthday-sign.html
http://www.prudentbaby.com/2010/06/diy-tissue-garland.html
OR IF THAT DOESN’T WORK
3. Go directly to the Prudent Baby homepage at http://www.prudentbaby.com (If that link doesn’t work just copy and paste the url into your browser.) Then type DIY Tissue Number Birthday Sign or DIY Tissue Garland into their search box (currently on the top right sidebar) and links should show up and hopefully work 🙂
Sorry for the inconvenience. I’ve never had this trouble with any other links before.

Posts COMING SOON…
Balloon Wreath Tutorial and Links Post
Ladybug Picnic Centerpiece Tutorial
Free Ladybug and Bug Fonts Links Post
Ladybug Picnic Products List
(I’ll be creating a separate post that contains all of the info and links for the supplies from this party. In the meantime if you want to know where I got something just ask in the comments.)
Related Posts
BIRTHDAY TUTORIALS
*DIY No Sew Party Hat Tutorial

*Ribbon Topiary Video Tutorial (Centerpiece)

*Tissue Number Birthday Sign (Mini-Tutorial)

BIRTHDAY PARTIES
*Birthday Girl…2 years old: Photos of Adaline at her birthday party
*Ladybug Picnic: 2nd Birthday

*Pink and Green Polka Dots and Cupcakes Party: 1st Birthday

*Ham and Man Party: 30th Birthday

*Celebrating 30 years in 30 days! All of my birthdays from 1980-2009
BIRTHDAY TRADITIONS
*Birthday Traditions: Personalized Birthday CD
*Birthday Traditions: Knife and Cake Server
*Birthday Traditions: Professional Photos
*Birthday Traditions: Photo Puzzle
*Happy 2nd Birthday, Adaline!
+Birthday posts will be published all throughout September 2011 including tutorials, party decor ideas, and birthday traditions!

Coolest Family on the Block is committed to helping you find creative ways to have fun and make memories with your family all year-long. Don’t miss an idea, tip, or trick…subscribe and have updates sent directly to your email!


")
Ribbon Topiary Video Tutorial (Centerpiece)


)
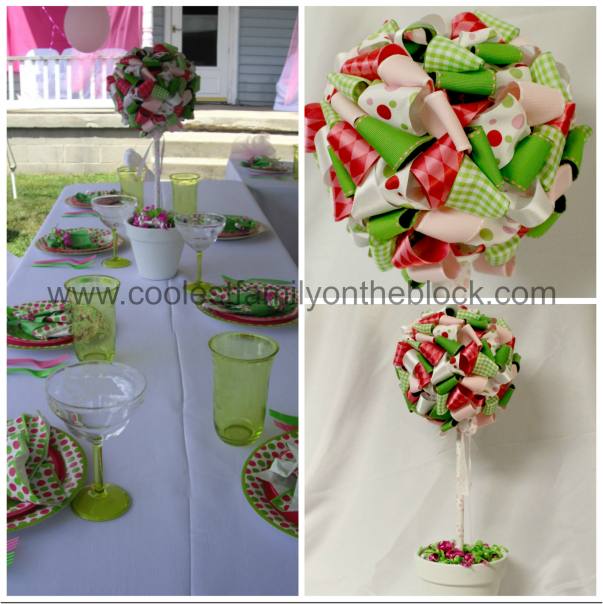
For Adaline’s 1st Birthday Party in 2010 I made ribbon topiaries as the centerpieces. I originally saw the idea and tutorial on the Polka Dot Birthday blog. I bought all of the supplies for the topiaries at The Hobby Lobby and got the ribbon at 50% off.
While making the ribbon balls for the topiaries last year I made a video “tutorial” (if you can call it that) of how to put the ribbon ball together. The video is really unprofessional since I did it by myself on a whim while Adaline was napping. I didn’t even have any free hands to make the ribbon ball while holding the camera!

Supplies to make a ribbon ball:
-Styrofoam ball
-Ribbon
-Straight pins
Supplies to make a topiary:
-Completed ribbon ball or floral ball
-Wooden dowel rod
-Flower pot, bucket, basket, box, etc.
-Floral foam (to hold the dowel in place)
-Curling ribbon, Easter grass, moss, shredded paper, etc. (to cover the floral foam)
Video Tutorial for Ribbon Ball:
(Click to view on YouTube)
(Note: I edited the video on 10/31/13. To watch the excruciatingly long unedited version Click to view on YouTube.)
Instructions:
1. Cut the ribbon into 4.5″ strips

2. Loop the ribbons


Secure with two straight pins. I angled the pins.


3. Cover the entire ball with strips of ribbon. Fill in as necessary.
4. Put the floral foam into your pot or topiary base of your choice
(If the pot needs painted…paint it first!)
5. Paint or cover your dowel rod
6. Poke the dowel rod into the floral foam and also into the completed ribbon ball
7. Cover the floral foam with curling ribbon, etc.

)
Below are the details for what I used to make the 3 ribbon balls.

Details:
-I used 6 inch foam balls
-I used 16 yards ribbon per ball cut into 4.5” strips (48 yards total for 3)
-I used 20-22 strips per color and used 6 different colors,
120-132 strips per ball (360-396 total for 3)
-I used 2 straight pins per ribbon, a total of 250 pins
-The topiaries cost me $20 a piece to make
-The ribbon balls took about 2 hours each to complete
)
This post is linked to:
Tip Junkie /Design Dazzle / Patches of Pink / The Frugal Girls: Chic and Crafty
DIY No Sew Party Hat Tutorial / Tissue Number Birthday Sign (Mini-Tutorial)
Ladybug Picnic: 2nd Birthday / Pink and Green Polka Dots and Cupcakes Party: 1st Birthday / Ham and Man Party: 30th Birthday / Celebrating 30 years in 30 days! All of my birthdays from 1980-2009 / Birthday Girl…2 years old
Birthday Traditions: Personalized Birthday CD / Birthday Traditions: Knife and Cake Server / Birthday Traditions: Professional Photos / Birthday Traditions: Photo Puzzle / Happy 2nd Birthday, Adaline!

The Night I Got Arrested and Changed My Name to David (not really)
Don’t be alarmed by the story I’m about to tell you. Here on the other side of things the baby and I are just fine, so just sit back and see the humor in the story.
I’ve been absent from the blog this week. Adaline’s birthday is coming up in just two weeks and I’ve been busy making and planning things for her party. Yesterday after spending the day making her party hat and then a balloon wreath, I finally sat down to relax. My mom was there to help out with Adaline while I finish things up. All of the sudden I started cramping. The cramps were down really low, almost in my pelvic area, and there was some pain in my lower back too. This didn’t feel like gas pains, or labor pains, or the kind of cramps I had during my miscarriage…it was really different from any kind of cramp I’d ever had before.
Well, long story short after about 20 minutes of the cramping I started to bleed. It wasn’t a lot of blood. It was very light and only when I wipe…it was a very light red (a pinky orange). I was 11 weeks and 4 days and I knew that if I was losing the baby there isn’t anything that they could do about it. Still I decided since I was cramping and bleeding I should go to the ER and get checked out just in case. I went upstairs to get dressed while my mom called to see if she could find someone to sit with Adaline. While I was upstairs I called Cool Daddy at work and told him what was going on. He said he’d find someone to come in for him and he’d take me to the hospital.
My hubby came straight from work and took me to the hospital while he was still wearing his uniform. We arrived at the ER and got checked in at 8:48pm, at this point I wasn’t cramping anymore and I was feeling fine other than being nervous and worried. We sat for a while before another desk nurse called me back to ask me some details. I was sitting in a wheelchair and hubby was standing next to me. After the nurse finished asking me questions, she looked at my husband and said, “Are you related?” and when he said that he was my husband she started to laugh. She said, “Here’s what I thought was going on. I thought you were taking her to jail and had to bring her to get checked out first. Then I thought, wow, she’s awful nice to be going to jail.” Of course we both started to laugh and I said, “He had to leave work to bring me here and he didn’t change first. Thanks, honey.” So there I was, a pregnant hardened criminal waiting to get checked before heading off to the slammer 😉
They got me into an ER room and into a gown. There was some waiting and waiting and then eventually and ER doctor came in. He said that he’d do an ultrasound to check for a heartbeat, they’d draw some blood to check my HCG levels, and take a urine sample to check for a urinary tract infection. So they gave me a cup and I went to fill it up. Right next to the toilet was an automatic toilet paper dispenser with a mind of its own. I was barely near it when it started dispensing tp onto the floor (and you don’t think I was going to use that do you? *shudder*). Then when I needed to use the paper and I waved my hand all around it nothing would come out, I had to reach my hand in there and yank some out. When I was all finished and walking away it started dispensing tp all over the floor again. Nice.
After all of the toilet paper fun the nurse came in and took my blood sample. Then she rolled in the portable ultrasound machine. And then we waited and waited and waited. Another nurse popped her head in and asked if we were down with the machine yet. I told her they’d never even used it and she said she would wait. A little while later the doctor came back in and said they were taking the ultrasound machine to someone more urgent. Eventually he came back at 10:44pm and we got this ultrasound thing started.
The doctor did an abdominal ultrasound (thank goodness), he showed us the baby and it appeared to have a good, strong heartbeat. He didn’t do the thing where they measure the heartbeat and tell you the number. Either this machine didn’t do that or he didn’t know how. So while we didn’t get a number of how strong the heartbeat was, we could see it and it looked good. The baby wasn’t moving (probably sleeping), although I thought I saw an arm move just a little.
The doctor said he was waiting on my test results and then we could go home. I was to call my ob the next day to let them know what was going on and to come back to the ER if I started soaking pads (I was barely bleeding at this point). Then he gave us a copy of the ultrasound. My husband looked at it and said to me, “Is your name, David?”

There on my ultrasound was the name David So-and-so, who I assume is the guy that got his ultrasound before me and the doc never bothered to change the name. Boy, won’t David be surprised to find out he has a uterus…and he’s pregnant!
After the doc left they seemed to forget about us again for nearly an hour. Hubby finally went to stand outside in the hall where a nurse spotted him and apologized and said that a shift change happened and he has my discharge papers. He apparently didn’t have my test results, but he assumed that everything was fine since they were discharging me. No one told me my HCG level. Oh well. I was too tired to care at that point. We got in the car to go home at 11:44pm.

So near as we can tell everything is fine with mom and baby. I never went to jail and I hear that David is already picking out names and lining up interviews. The End.
Coolest Family on the Block is committed to helping you find creative ways to have fun and make memories with your family all year-long. Don’t miss an idea, tip, or trick…subscribe and have updates sent directly to your email!
Guest Post: Making the Most Out of Every Day This Summer
This is a guest post by Theresa from Our Life in Words. Please stop by and visit her great blog!

My girls (ages 9 & 11) were only out of school for a few days when I heard, “Mom, I’m bored!”
My first reaction was what my mom used to say to me, “Is your closet clean and tidy? All your clothes hung up? Are your dresser drawers organized? Are all of your socks in the same drawer?”
As much as I never wanted to turn into my mom, summer is a great time to teach kids organization and how to clean up after themselves.
Summer is also an opportunity for parents to spend quality time with their kids doing all of those things they wish they had time to do during the year. It doesn’t have to take a lot of money.
Here are some fun *free* things you can do with your kids:
*Have a water fight; use the hose, water balloons, Super Soakers, rags & buckets
*Wash the car together – kids LOVE this!
*Make homemade play-doh together and play with it
*Go for a bike ride
*Go for a walk
*Play frisbee or catch
*Make a tea party for your little girl and use your real china & dress up
*Find a patch of lawn that doesn’t have any grass, turn the hose on and make mud pies with your son
*Make roads in the dirt with your boy, play with matchbox cars
*Check out what free summer programs your library is offering
*For more ideas on fun things to do with your kids for free over the summer, check out books or parenting magazines in your local library!
Work on school skills:
*Play Mad Libs – Kids LOVE Mad Libs and they are a great, fun way to teach parts of speech.
Google Free Mad Libs or check out Education Place.
*Play Math Bingo – I bought this game in the Dollar Store and my kids LOVE it!
*Sign up for summer reading programs at your local library
*Write a story with your kids. Start with a sentence and ask your children to each add a sentence. If they are too young to write, write it down for them. Have them illustrate it.
*Keep a journal with your kids of all of summer fun you have. Press flowers from your walks and glue them in. Or take photos of your fun and glue them in.
“The days are long, the years are short.” ~ Gretchen Rubin
Make the most of every moment with your child because childhood doesn’t last forever!
Do you have any suggestions for frugal fun this summer?
Theresa is a former teacher who spent nine years as a stay at home mom. She now works part-time as the Assistant Children’s Librarian at her local library. She blogs regularly at Our Life in Words and weekly at Three Thinking Mothers.
Oh, no he didn’t!
I’ve sung my hubby’s praises on this blog before. I’ve told you why he’s so awesome, and showed you cute things he’s done, and the great Mother’s Day gift he gave me. Despite the picture I may paint here (my husband is a lot of wonderful things…but) he’s far from perfect. There are plenty of things that he does that leave me scratching my head or screaming at the top of my lungs…I just try to leave it off of the blog. Today is not one of those days, my friends.
On Friday night Adaline spent the night at my mom’s house. I woke up with a sore throat and decided to spend the day in bed. Cool Daddy had the weekend off so he was planning on painting our front steps and porch. I told him to get a color like what we already had…white with the slightest hint of blue. At some point my mom called to say that Adaline was upset and was asking for me, and since I only live a block away I tossed on some clothes to walk over to my mom’s house. I knew that I’d need to go out the back door so as not to walk on the freshly painted porch…but I decided to pop my head out of the front door to make sure my hubby had his keys. I opened the front door and saw this…
(Insert theme music from Physco here)

And then there was this

And this

Oh, yes. It wraps around the side of the house!
If this color looks familiar to you but you can’t put your finger on where you’ve seen it, let me help you.
Maybe it was here…

Or here…

Or even here…

What the…?
When I opened up the door and took a look at the paint on the porch and then looked at my husband. He had his faced all scrunched up and was bracing himself for an ear-lashing from me. “What? Why? I said white! Oh my goodness…why did you keep painting all of this, you wasted an entire day!” He gave me reasons such as, “It looked gray on the paint chip (??? I asked for white!), I thought it would lighten up as it dried (And turn to white?), I thought I should ask you to come and look at it and then I decided not to (Because your brain fell out of your ear?).
Just to give you a visual of what the previous porch color was…

Yeah, it’s just a tad off. 😉
Even though my hubby was still hard at work painting when I opened the door to this catastrophe, once I had indeed confirmed that it looked awful he was immediately embarrassed and wanted to go to the hardware store right away to get new paint before too many neighbors saw the porch. Naturally I said, “You are never picking out paint colors alone again.” So after stopping by my mom’s house to console Adaline and fill my mom in on the porch paint madness, I…with the sore throat, pregnant, having not showered yet that day, while it was 90 degrees outside…went with my husband to the hardware store.
Before we left for the hardware store I had to take photos…and since my husband was suddenly so embarrassed I hung a sign before we left lest any passerby thought we intentionally painted our porch that color (even though we sorta did).

The note reads:
Yeah, that’s NOT the right color!
(Never let Papa Smurf paint your porch!)
He showed me the paint chip he’d selected.
Yes that indeed looks very gray
(or not at all…and again I asked for “white”)

This is the color that I selected.

And here they are together.

When we got home from the store that evening my husband started putting the first coat on right away. He worked until it was dark out and I think he got everything covered with at least one coat. The next day he finished it up and here it is now…

Tada!


I had him replace the flowers in the front too since I didn’t care for the previous ones he planted over a month ago. I think the petunias look great, but it’s kinda hard to see in this light 😦


Now he has to find a way to get the blue paint off of the bricks so that it doesn’t look as though a Smurf was squashed on our sidewalk.

Believe it or not I wasn’t actually mad, I was mostly…confused.
And mildly amused…mildly.
When I went back upstairs that night before he went outside to repaint the porch he said, “I love you!” and I said, “I love you, too. Thanks for the blog post.”
This post is linked to…

3.) A bad day.
Did you see last week’s Writer’s Workshop post?
Read about 10 (Obscure) Shows I’d Like to Make a Comeback!

Related Posts:
*Large Marge Update 2: Some more stair/porch related stuff.
Coolest Family on the Block is committed to helping you find creative ways to have fun and make memories with your family all year-long. Don’t miss an idea, tip, or trick…subscribe and have updates sent directly to your email!
Guest Post: Coolest Mud Pie Cake Ever! (Recipe)
This is a guest post by Retha from Mommy Bee Wisdom. Be sure to stop by and visit her blog 🙂
Fitting name right? I have tried for 5 years now to out-do the coolness of this cake and have failed. It was so cool, I have had sisters since copy me, so now I figured is the right time to share it.
Supplies you will need:
2 Boxes of Chocolate Cake mix (I always use 2 to 4 depending on the guests).
2 tubs of Chocolate Frosting (keep this number equal to the amount of cake mixes).
2 bags of gummy worms
A wheel barrel (toy plastic and washed with dish soap)
A shovel (toy plastic and washed with dish soap)
If you want this a bit more girly, add one small terracotta pot and a fake flower and some pink gloves.
Instructions:
1. Follow the instructions on the cake mix box. Bake each box separately, trust me on this one.
2. Allow the cakes to cool completely, then frost as you normally would.
3. Spread the gummy worms over the cakes.
4. Now very carefully pick up each cake and dump it into the clean toy wheel barrel.
5. With a spatula run it through the cakes to make them look nice and chunky.
6. Sprinkle a few gummy worms over the top of the cake.
for the girl cake put a shovel full of cake in the pot and insert the flower, stick it on top of the cake and lay the gardening gloves over the edge.
7. Insert the shovel into the cake.
TA-DA!
")
Now you have the coolest ever mud pie/gardening cake!
Retha Barton blogs at Mommy Bee Wisdom where she teaches other moms that living life from scratch isn’t as hard as it sounds. Retha shows you that you can make it without a lot of money and that sometimes doing things the old way can be more rewarding.
Related Posts:
*Guest Post: Food as Tradition – Norwegian Butter Cookies: Another recipe guest post by Retha!


%20%23birthday%20%23traditions%20)